Page 3 of
3
|
Project #1
Step-by-Step Instructions
Ā
Let's Get Started--
(Make sure you've done the preliminary steps
before startingĀhere!Ā Go to Programs and Files You
Need: first.)
- Installing WinImage: If you download the
WinImage.exe file, it will be self extracting and will
run an install routine for you, offering to put a shortcut on your
desktop and a subdirectory in your 'Programs' menu.Ā If using the
install routine, direct the install to the 'C:\Bootable CD
Project\WinImage' subdirectory.Ā
But you do not have to 'install' WinImage. If you download
the WinImage.zip file, you can simply extract the files
to a directory and run 'winimage.exe', and the program will run just
fine.
I downloaded the WinImage.zip file to the
'C:\Bootable CD Project\Downloads\WinImage' subdirectory,Āand
thenĀextracted the files to 'C:\Bootable CD
Project\WinImage'ĀsubdirectoryĀusing WinZip.
- Start WinImage by clicking on
'winimage.exe' in the 'C:\Bootable CD Project\WinImage'
directory or the Desktop shortcut if you used the install routine.Ā
Now the fun begins--if you were to 'click' on the Win98se
Boot Disk file 'win98.exe' , it runs a program that
tries to create a Win98se boot floppy disk in a floppy disk
drive.
But if you select in WinImage the menu item
'File|Open' , and in the 'Open' dialog
box in the 'Look in:' box, navigate to 'C:\Bootable CD
Project\DownLoads\Win98se OEM Boot Disk', you will
not see the 'boot98.exe' file.
If
you now go to the 'Files of type:' box in the lower
section of the 'Open' dialog box, click the down arrow
and at the bottom of the list select 'All WinImage files
(*.IM?,*WLZ,*.EXE)', now the 'boot98.exe' will
be listed. Select it and click 'Open' , and now the
'hidden' image file within that .exe file is opened and the files meant
to be copied to a floppy disk are revealed and listed in WinImage's main
Window!
Screen Shot--WinImage Open '.exe' files.
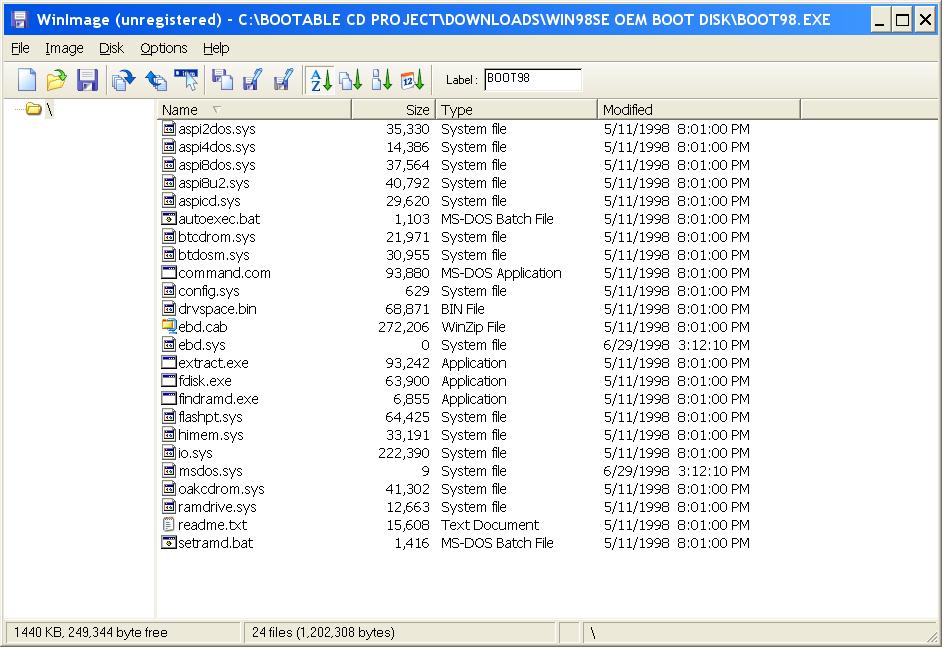
Screen Shot--Win98
Boot Disk Files in WinImage.Ā
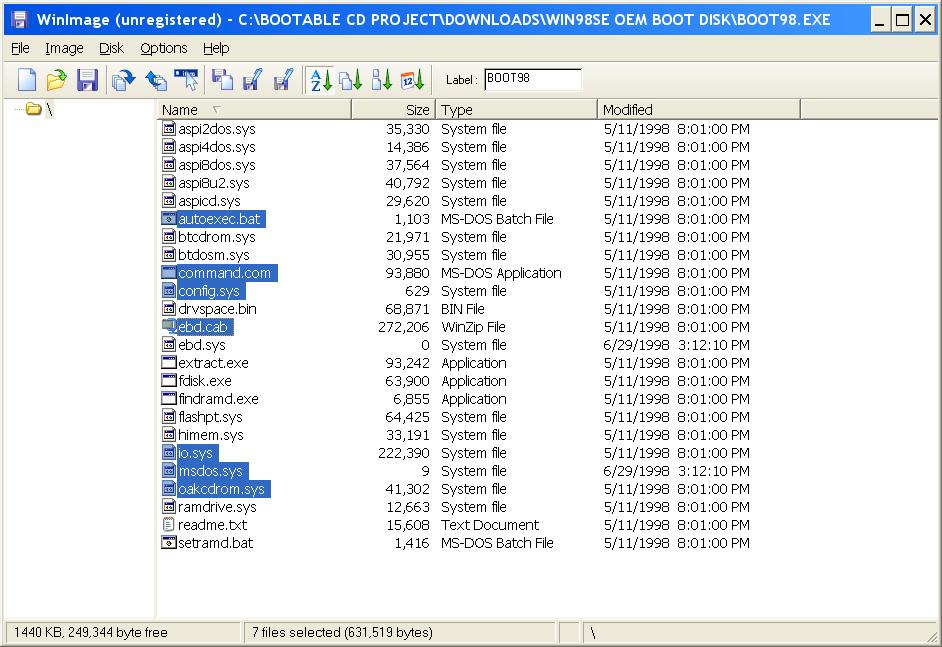
- Hold down the 'Ctrl' key and
single click on the following files to select them:
- autoexec.bat
- command.com
- config.sys
- io.sys
- msdos.sys
- oakcdrom.sys
- ebd.cab
Screen
Shot--Highlighted Win98 Boot Disk Files.
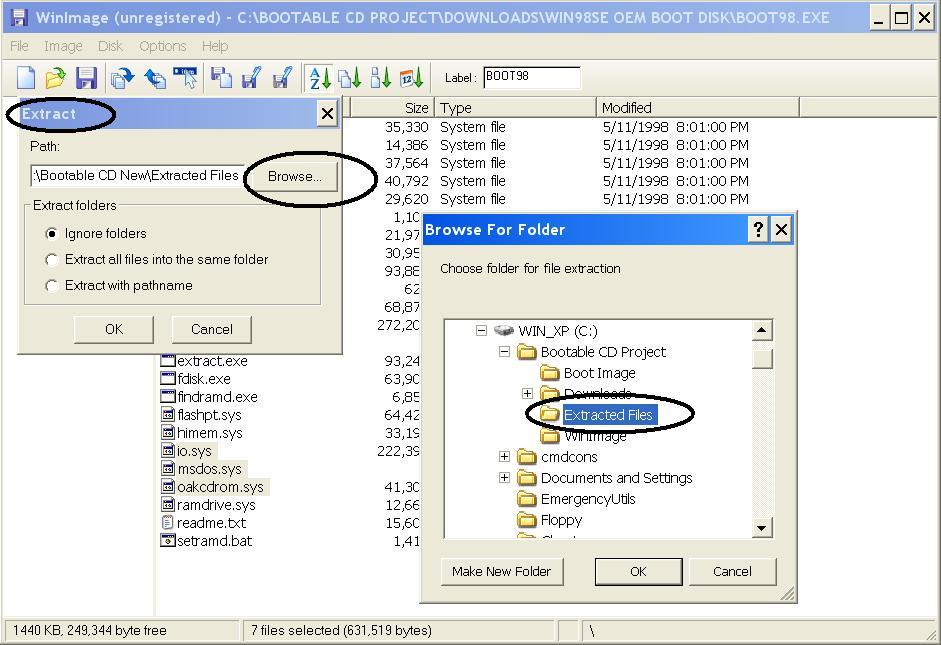
Go to the
'Image|Extract' menu item, and in the
'Extract' dialog box use 'Browse...'
to select 'C:\Bootable CD Project\Extracted Files'. Click
'OK' and now those files are located on the hard drive
in the subdirectory 'Extracted Files'.
Screen Shot--Extracting Win98 Boot
Disk Files.
Screen Shot--'Extract' dialog box +
Browse.
- Open Windows' 'Notepad' program
(found under 'Start|Programs|Accessories' --it's a
simple text only program that will not add 'formated text' to the text
file--just simple 'ANSI' text). Select 'File|Open' . In
the 'Look in:' box navigate to 'C:\Bootable CD
Project\Extracted Files', and then click on the down arrow for the
'Files of type:', and select
'All Files'. Now select 'config.sys'
and 'Open' .
Screen Shot--opening
'config.sys' in Notepad. Ā
Now, select the 'Edit|Select All' menu item to
highlite all the text, and then select 'Edit|Delete' to
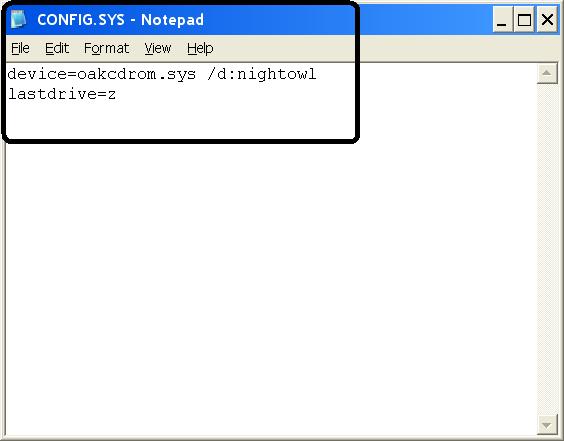
clear all the text. Now copy the following text, and then paste it to
the 'config.sys' file in Notepad:
device=oakcdrom.sys
/d:nightowl
lastdrive=z
Screen shot--Your 'config.sys' file
should look like this:ĀĀ Ā
And,
finally select the 'File|Save as...' and save it back
to the same directory and with the same name as you started from, i.e.
in 'Extracted Files' as 'config.sys'.
- Still using 'Notepad', select
'File|Open', you should still be in the 'Extracted
Files' subdirectory, and now select 'autoexec.bat' ,
and 'Open' . Now, select the 'Edit|Select
All' menu item to highlite all the text, and then select
'Edit|Delete' to clear all the text. Now copy the
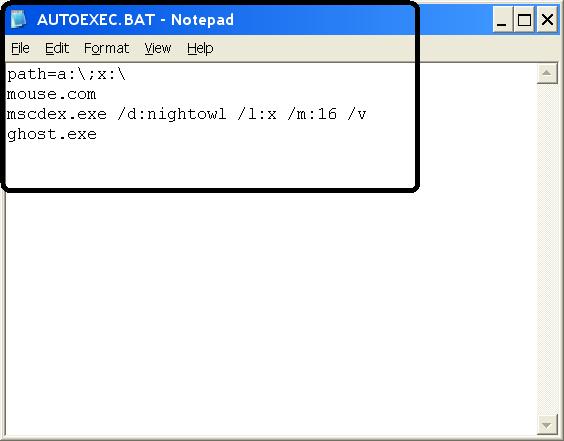
following text, and then paste it to the 'autoexec.bat' file in
Notepad:
path=a:\;x:\
mouse.com
mscdex.exe /d:nightowl /l:x /m:16 /v
ghost.exe
Screen shot--Your 'autoexe.bat' file
should look like this:
And, finally select the 'File|Save
as...' and save it back to the same directory and with the same
name as you started from, i.e. in 'Extracted Files' as
'autoexec.bat'.
- The DOS program 'mscdex.exe' is
inside the 'ebd.cab' file (Emergency Boot
Disk.cab file) that was
extracted to the 'Extracted Files' subdirectory. Using Windows Explorer
you can click on 'ebd.cab', and it will open that cab file and you will
see the 'mscdex.exe' file listed with several others.
You need to 'drag-and-drop' or 'copy-and-paste' it to the 'C:\Bootable
CD New\Extracted Files' subdirectory so it is outside of the cab
file.Ā
(Alternatively, the files 'oakcdrom.sys' and
'mscdex.exe' can be found in directories created when Ghost 2003 was
installed in Windows.
In WinXP, theĀpath
is:
'C:\Documents and Settings\All
Users\Application(space)Data\Symantec\Ghost\Template\common'.Ā
In Win98se, the path is:
'C:\Windows\Profiles\All
Users\Application Data\Symantec\Ghost\Template\common'.)Ā
Notes: To explain what's going on in #4 and #5 above: We are
changing the boot files for DOS, 'config.sys' and
'autoexec.bat' , so they perform the steps we need them
to do.
- The 'oakcdrom.sys' file is a
'universal' driver that mounts a CD or DVD drive so you can 'read'
from it. The '/d:nightowl' after 'oakcdrom.sys' is a
'command line switch' that tells oakcdrom.sys what name to give to the
CD-ROM drive that 'mscdex.exe' in the autoexec.bat file will look
for--it's just a designated name--could be anything that is eight or
less characters after the '/d:' .
- The 'lastdrive=z' tells DOS to
reserve memory space so drive letters A: through Z: can be
used.
- The 'path=' instructs DOS to
look in the root directory of the drives with these letters for the
listed programs that are called for in the autoexec.bat file, or typed
at the DOS prompt--so, in this case, the root directory of A: and X:.
You can also specify specific folders (directories), and
subdirectories if you wish.
- The 'mouse.com' will load that mouse
program if found in the 'path=' statement path.
- The 'mscdex.exe' program assigns the
drive letter to the optical drives.
Ā
The 'command line
switch' '/d:nightowl' is the link to the config.sys
program 'oakcdrom.sys' that mounted the optical drive.
The
'command line switch' '/l:x' tells 'mscdex.exe' to
use as the first possible drive letter, the letter X:--so the first
optical drive letter can be no less than X:. If you have a second
optical drive, it will be assigned the drive letter Y:.Ā
If you wish theĀfirst letter to be assigned to the
optical drive to be M:, then change the 'x' toĀ'm'Āso it
looks like this '/l:m'.Ā But, in DOS, that letter has to be after
all the hard drive partitions have been assigned, or else it will
default to the next available letter after the hard drive
partitions.ĀĀYou would also have to change the path
statement above so theĀ'x' is 'm', like so:Ā
'path=a:\;m:\'.Ā
The 'command line switch'
'/m:16' is telling DOS to set aside 16 memory sector
buffers for better performance.
And the 'command line switch'
'/v' is for 'verbose'--it tells 'mscdex.exe' to
display after loading the full text results of what it has
done.
- The 'ghost.exe' tell DOS to
automatically start Ghost.
ĀNow, copy 'mouse.com' from the 'C:\Bootable CD
Project\Downloads\Mouse (Microsoft)' to the 'C:\Bootable CD
Project\Extracted Files' subdirectory.
- And copy 'ghost.exe' from
your 'C:\Program Files\Norton SystemWorks\Norton Ghost' (assuming that's
where your Ghost program is located) to the 'C:\Bootable CD
Project\Extracted Files' subdirectory.
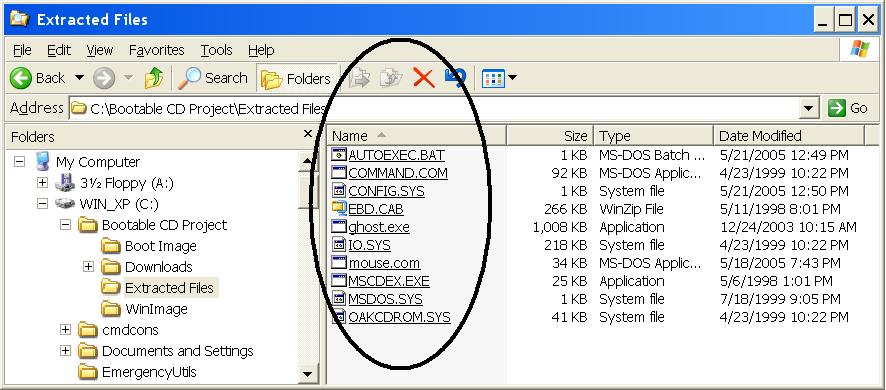
- ĀScreen shot--Now, your 'C:\Bootable CD
Project\Extracted Files' subdirectory should have the following:
- autoexec.bat
- command.com
- config.sys
- io.sys
- msdos.sys
- oakcdrom.sys
- mscdex.exe
- mouse.com
- ghost.exe
- ebd.cab
In WinImage, select
'File|New' , in the 'Format selection'
dialog box, click 1.44 MB, then click 'OK'. Then
select 'Image|Inject'. In the 'Inject'
dialog box, using the 'Look in:' box, navigate to the
'C:\Bootable CD Project\Extracted Files' subdirectory, and holding down
the 'Ctrl' key, single click on each of the above named
files except 'ebd.cab' to highlite them. Now
click 'Open' and confirm by clicking 'Yes' that you want
to inject all 9 files.
Screen Shot--'Inject' dialog box.
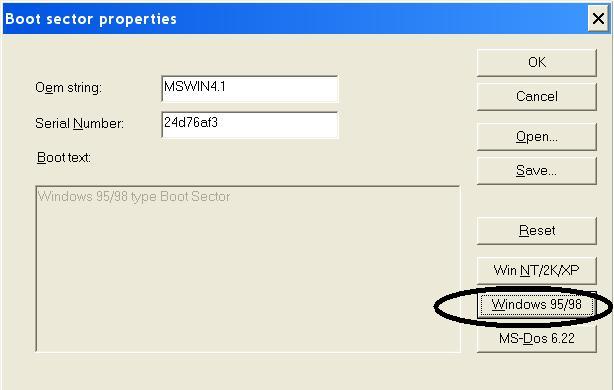
- Here's a
critical step--now select 'Image|Boot Sector
Properties...', in the 'Boot Sector
Properties' dialog box click on the 'Windows
95/98' button, and then 'OK'
.
Screen Shot--WinImage--Boot Sector Properties...
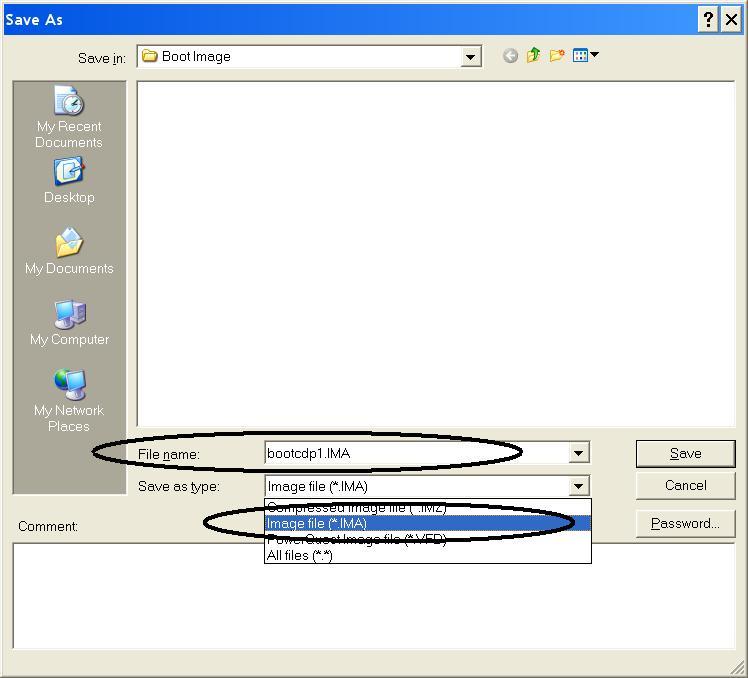
Now, select
'File|Save as...', in the 'Save as'
dialog box, select 'Save in' and navigate to
'C:\Bootable CD Project\Boot Image'. In the 'File
name:' box type 'bootcdp1'(that's for Bootable
CD Project 1),Āand in the 'Save as type:' box,
select 'Image file (*.IMA)' .
Screen
Shot--WinImage--'Save as...*.IMA file'
You should have 'bootcdp1.ima' file
in the 'C:\Bootable CD Project\Boot Image' subdirectory
now.
- Now it's time to head to your CD/DVD
burning program. I would suggest using a Re-writable
CD at first so you can erase and start over if something
doesn't work out right the first time.
I
willĀbe usingĀRoxio's Creator Classic
v7.1.1.183Āfor the steps below:
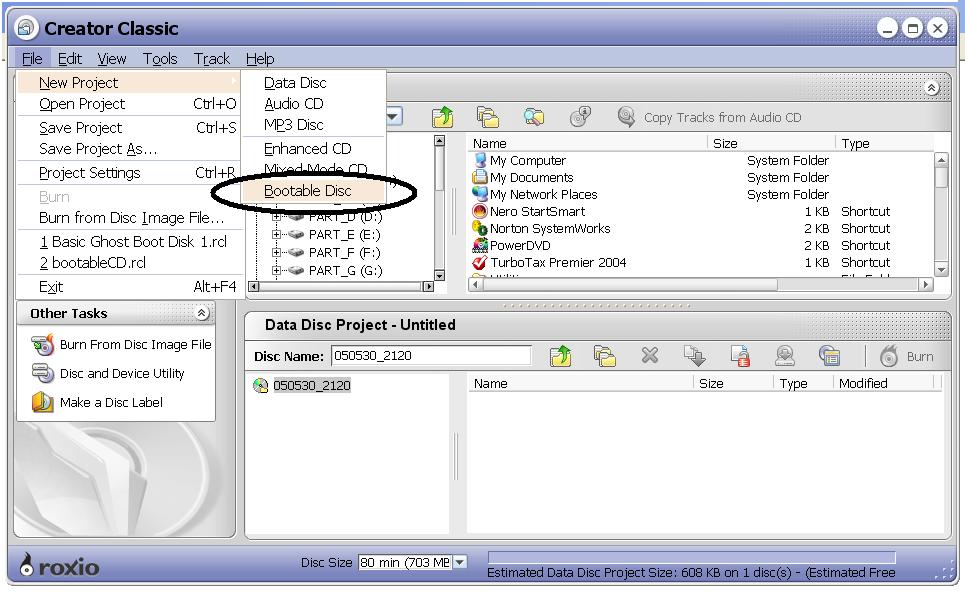
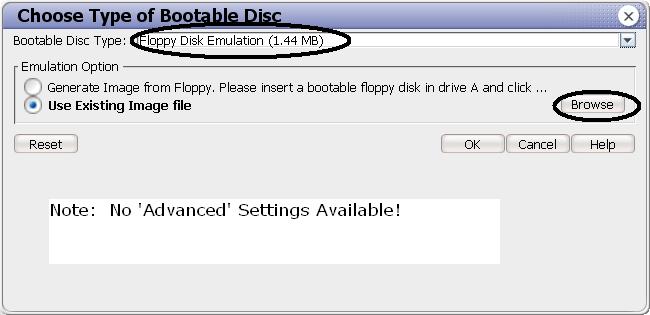
- Open Creator Classic. Select 'File|New
Project|Bootable Disc' . In the
'Choose Type of Bootable
Disc'
dialog boxĀselect 'Floppy Disc
Emulation (1.44 MB)', and 'Use Existing Image
file' and click on 'Browse'. Go to your
'C:\Bootable CD Project\Boot Image' and click on the
'bootcdp1.ima' file, and then click
'OK' .
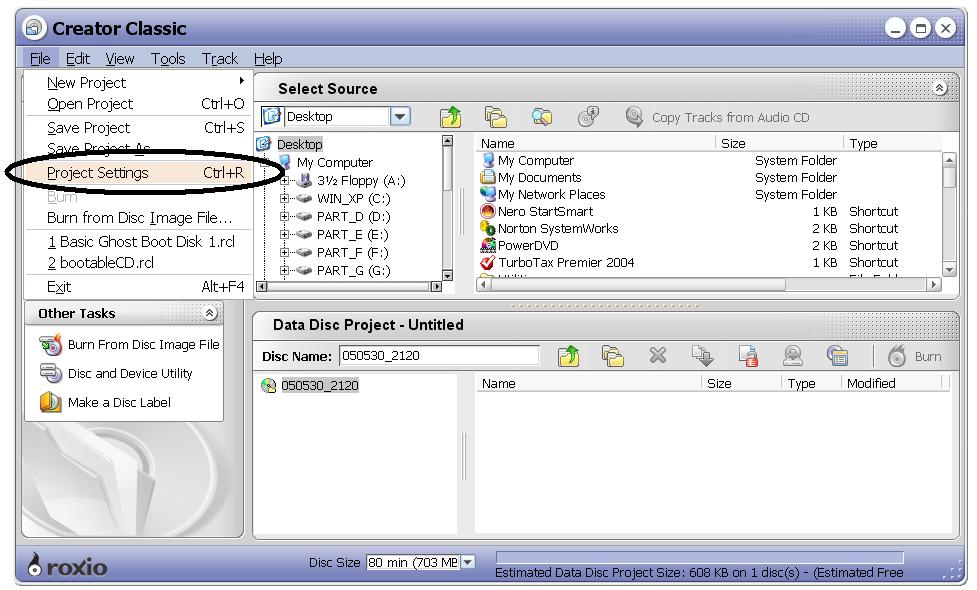
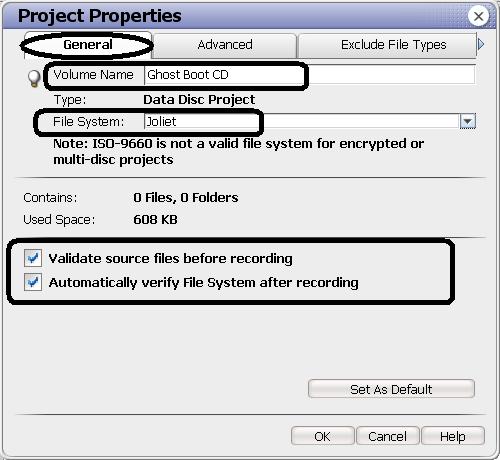
- Now click on 'File|Project Settings' . On theĀ 'General' tab, you
can change the CD's 'Volume Name'--I typed in
'Ghost Boot CD'. I selected the 'File
System:' as 'Joliet'. And I checked the two
lower boxes 'Validate source files before recording'
and 'Automatically verify File System after
recording' .
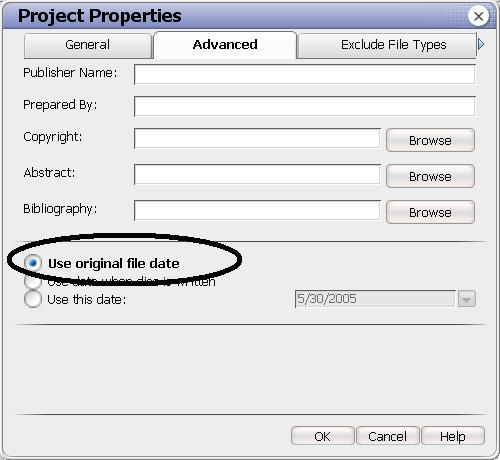
On
theĀ 'Advanced'
tab, I left everything blank, and clicked on 'Use original
file date' .
On
theĀ 'Exclude
file types' tab, I made sure
'Exclude all hidden files' and 'Exclude all
system files' were not checked.
Click on 'OK' .
- Time to burn! (Remember, if possible,
I suggest you use a re-writeable CD for testing so you
can erase and re-use and not waste CD's until you're sure it going to
work okay.)
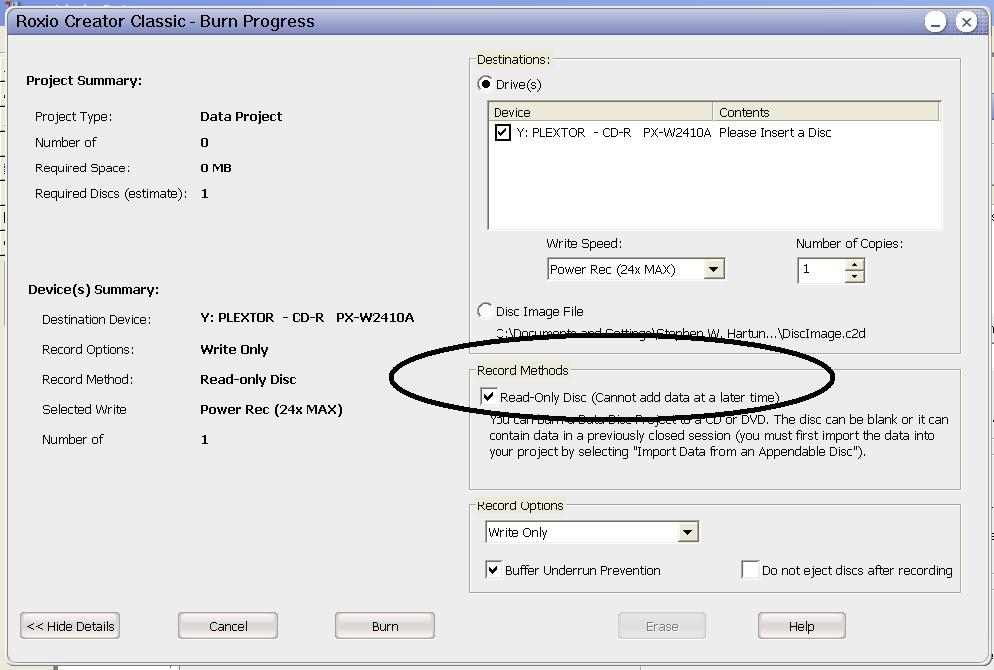
Press the 'Burn' button.
In the 'Roxio Creator Classic-Burn
Progress' , select '>>Details'.Ā In 'Record Method', select the
check box 'Read-Only Disc (Cannot add data at a later
time)'. And click 'Burn' . When finished, my
program ejects the disk tray.
- Time to
test the bootable CD. Close out any other programs and save any
information that needs saving. Leave the newly burned CD in the drive.
Re-boot.Ā You may have to enter the BIOS toĀmake
changes to the 'boot order sequence' or whatever your system requires to
boot from the opticalĀdrive.Ā
When testing a DOS boot
disk, when you reach the point were it says 'Starting Win98...', I like
to press 'F8', and then select 'Step-by-Step
Confirmation' . This makes the DOS boot process go through both
the 'config.sys' file and the 'autoexec.bat' file line-by-line, and you
get to see the results of the line being executed.
If there is an
error message, you can see it and record the information for trouble
shooting. After each command, the system waits for you to press 'Y' for
yes before proceding to execute the next line.
(Note:Ā On
one of my machines, when you press F8, it brings up a
'Boot from...' menu.Ā I select the CD-Rom drive, and once the
system starts booting from the CD, I then press F8
again,Āto get theĀ'Step-by-Step Confirmation'
Āmenu.)Ā
|
ĀQuestions?Ā Go to Radified Forums
Ā |
